Counter app in REACT without create-react-app

Hello everyone, The most important thing in the world of web is JavaScript. Today we will see how to create a beautiful counter application using JavaScript library called React without using create-react-app.
Before manipulating into the application, we will see what is react and what are the prerequisites for this project.
React
An open-source JavaScript library that is used for building user interfaces specifically for single-page applications.
Prerequisite :
- Nodejs - A javascript server
- Yarn - A package management
- Babeljs - The compiler for next generation JS
First make sure your system contains the prerequisite or else don't worry we will see that also.
Installation of Prerequisite
- Installing Node.js is simply a straight forwarded one.
To check the installation of the nodejs, node -v
- NPM : Node Package Manager which allows you to install all the packages, libraries, dependencies which are needed for react.
To check the installation of npm, npm -v
Now, we need to install yarn, Enter npm install -g yarn
where -g stands for global
Awesome we installed nodejs and yarn successfully, to check the installation of yarn yarn --version
Yes, We configured all the prerequisite in our system, Now it's time to start building our counter application.
Steps for creating counter application
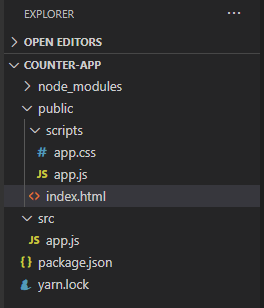
- Create a folder counter-app in your local system.
- Open that folder in VS Code or any editor, Create a folder named
publicinside the counter-app folder ( Folder which is going to serve complete assests for our app). - Inside
publicfolder create a file calledindex.html - Afterwards create a folder called
scriptsunder the public folder. - Create an
app.jsfile inscriptsfolder. We are going to write our JS logic inpublic/scripts/app.js. - In react we are going to write as JSX (JavaScript XML). So it doesn't get supported by web browser directly. So we are going to use babel.js (Library which will automatically convert JSX into normal old JavaScript).
Babel.js is the library which is used to convert JSX into normal old javascript which is understandable by browser.
To install babel.js in your system, npm install -g babel-cli@6.24.1. Awesome !!
To verify the installation of babel js, go and hit babel -help.
Wow, we successfully installed babel js in your system. Now it's time to install node modules for our project.
Open the project folder with cmd, and start typing yarn init. This will subjected to some questions, we don't need to bother about that just press enter key for default.
Once you finished the installation of node modules, there is a folder called node_modules, files called package.json,yarn.lock files will be added in to our project.
package.json will contains the details of our application and the dependencies which we are going to user in our project.
Now, it's time to install two dependencies to run our project successfully, (i.e) env & react which is used as preset for bable.js.
To install env & react,
yarn add babel-preset-react@6.24.1 babel-preset-env@1.5.2.
That's all about our installation, now it's time to create the folder to run babel.js before kick start our development.
To implement the babeljs feature we need to create a folder called
srcwhich is outside of thepublicfolder. Then we need to create anapp.jsfile which is undersrcfolder (i.e)src/app.js, Now we will understand what is the purpose of two app.js (i.e)public/scripts/app.jsandsrc/app.js.public/scripts/app.js- The file which contains our logic in normal JavaScript format (i.e) Browser readable format. This file is going to be updated automatically using babel.js (No need to touch this file).src/app.js- This is the file which we are going to write our react.js using JSX. Parallelly babel.js take care of converting your JSX logic to native JavaScript which is generated inpublic/scripts/app.js. (Main file in which we are going to write our app logic).
Atlast, we need to start the babeljs to do the above mentioned functionality for our app,
babel src/app.js --out-file=public/scripts/app.js --presets=env,react --watch
The final application structure will look like,
Finally all set go, Now we are ready to start our awesome counter app.
First, absolutely we gonna code for index.html
<!DOCTYPE html>
<html>
    <head>
        <meta charset="UTF-8">
        <title>Counter Application</title>
        <link rel="stylesheet" href="/scripts/app.css">
    </head>
    <body>
        <div id= "counter">
        <!--The main logic for our counter application from app.js-->
       </div>
    </body>
</html>
This is our basic skeleton of our webpage where our counter application will be injected in div with the id counter. Now we need to add react to our body (i.e)Gonna load react & react-dom to our project.
 <script src="https://unpkg.com/react@16.0.0/umd/react.development.js"></script> <!--Linking react package-->
 <script src="https://unpkg.com/react-dom@16.0.0/umd/react-dom.development.js"></script> <!--Linking react-dom package-->
 <script src="/scripts/app.js"></script> <!--Linking our counter application JS file-->
The final index.html will look like this,
<!DOCTYPE html>
<html>
    <head>
        <meta charset="UTF-8">
        <title>Counter Application</title>
        <link rel="stylesheet" href="/scripts/app.css">
    </head>
    <body>
        <div id= "counter">
        <!--The main logic for our counter application from app.js-->
       </div>
        <script src="https://unpkg.com/react@16.0.0/umd/react.development.js"></script> <!--Linking react package-->
        <script src="https://unpkg.com/react-dom@16.0.0/umd/react-dom.development.js"></script> <!--Linking react-dom package-->
        <script src="/scripts/app.js"></script> <!--Linking our counter application JS file-->
    </body>
</html>
Now it's time to work on src\app.js (Heart of our project),
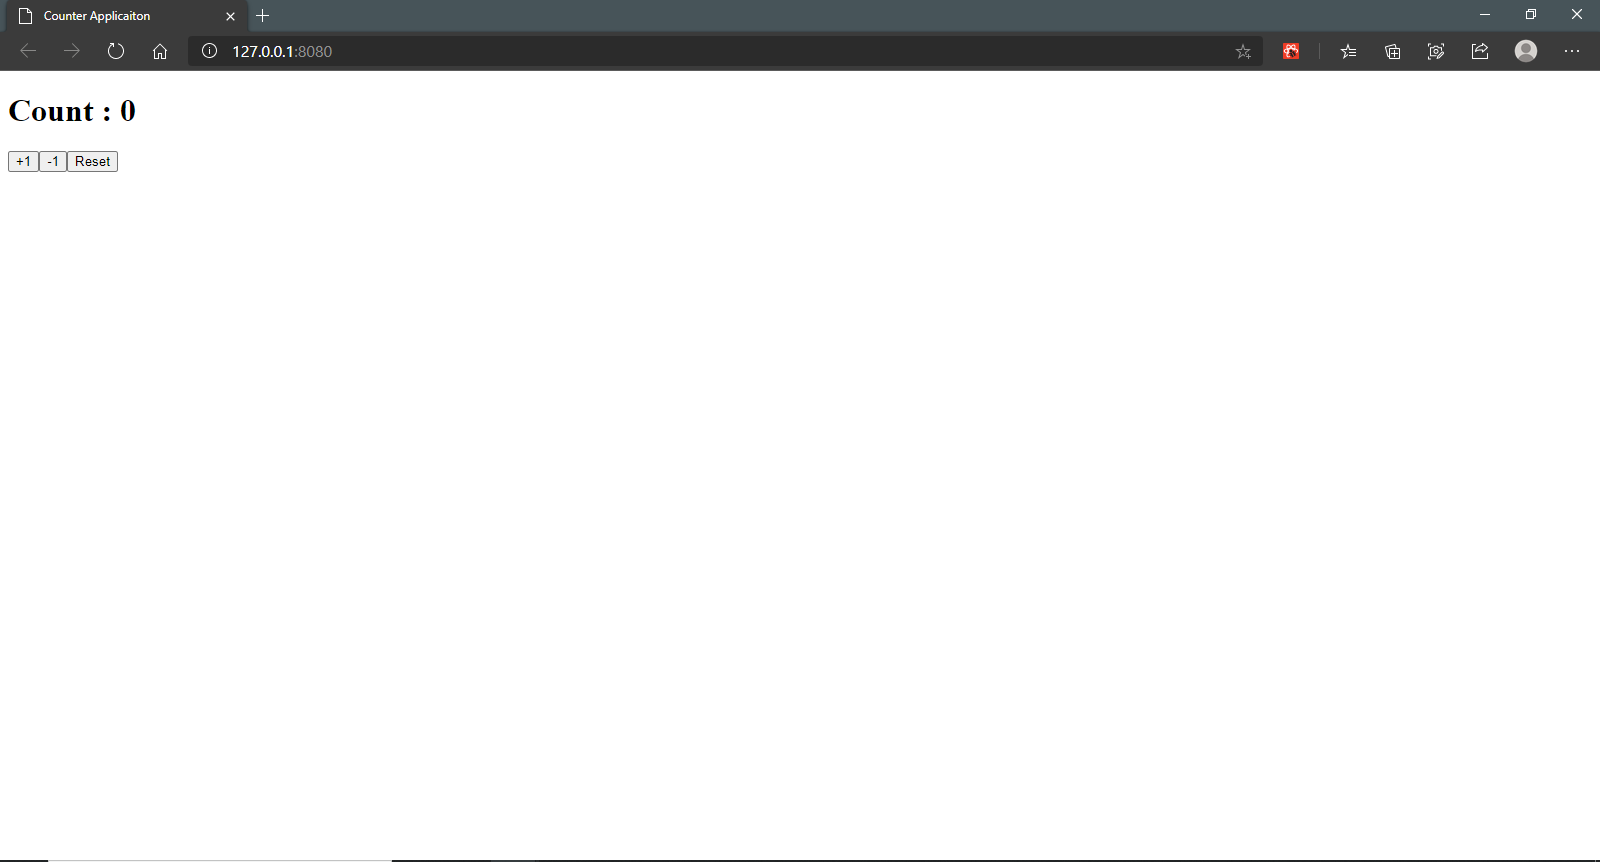
const counter = (
        <div>
            <h1>Count : {value}</h1>
            <button onClick={addCounter} >+1</button>
            <button onClick={subtractCounter}>-1</button>
            <button onClick={resetCounter} >Reset</button>
        </div>
    );
This is our very first counter application. I hope everyone understands the code, if the user pressed button is +1, it will make a call to addCounter function. Similarly for -1 and reset too.
Now we will see the addCounter, subtractCounter, resetCounter logic,
let value=0;
const addCounter = () => {
    value++;
};
const subtractCounter = () => {
    value >0 && value--;
};
const resetCounter = () => {
    value=0;
};
Here, we are implementing ES6 features including let, const, arrow functions.
Now we need to render our react app to index.html. To render, we use
var appRoot = document.getElementById("counter");
ReactDOM.render(counter,appRoot);
Now, our logic works but the count value will not get updated in our screen, isn't it? Yes, the reason is our counter component doesn't reload for every function call. To do this, we need to make three changes in our code.
1.Move our counter component and render call into an arrow function.
const template = () => {
    const counter = (
        <div>
            <h1>Count : {value}</h1>
            <button onClick={addCounter} >+1</button>
            <button onClick={subtractCounter}>-1</button>
            <button onClick={resetCounter} >Reset</button>
        </div>
    );
    ReactDOM.render(counter,appRoot);
};

var appRoot = document.getElementById("counter");
2.Call the template function every time, if value get altered.
let value=0;
const addCounter = () => {
    value++;
    template();
};
const subtractCounter = () => {
    value >0 && value--;
    template();
};
const resetCounter = () => {
    value=0;
    template();
};
3.Call template() in global scope for initialization,
let value=0;
const addCounter = () => {
    value++;
    template();
};
const subtractCounter = () => {
    value >0 && value--;
    template();
};
const resetCounter = () => {
    value=0;
    template();
};

const template = () => {
    const counter = (
        <div>
            <h1>Count : {value}</h1>
            <button onClick={addCounter} >+1</button>
            <button onClick={subtractCounter}>-1</button>
            <button onClick={resetCounter} >Reset</button>
        </div>
    );
    ReactDOM.render(counter,appRoot);
};

var appRoot = document.getElementById("counter");

template(); // Added template() function call to initialize the app
This will be our final code, Great salute to your patience.
Yes, We did it !!
Wait wait, One thing is missing right ?
If Javascript is the king, CSS is the crown !!
Yes true, We forgot to add CSS to our beautiful counter application. Now it's time to open app.css in our project.
CSS is completely yours, I just give the boilerplate for you!!
#counter {
    width: 25%;
    height:200px;
    margin: 0 auto;
    border-radius: 50px;
    padding-block: 20px;
    background-color: lightblue;
    text-align: center;
    align-items: center;
}
button{
    background-color: whitesmoke;
    height: 80px;
    width: 80px;
    border-radius: 110px;
    font-family: Verdana, Geneva, Tahoma, sans-serif;
    font-size: 13pt;
    font-weight: bold;
}
h1{
    font-size: xx-large;
    font-weight: 500pt;
    color: black;
}
body
  {
    background-size:cover;
    background-repeat:no-repeat;
    background-color:black;
  }
After adding this amount of CSS, Our project will be
Thanks for reading, I hope this project will definitely help you to kick start your passion towards react. Feel free to reach me @ Linkedin and don't forget to subscribe my newsletter.


